From the mobidai making to the technic, in this post you will find everything you need to create your kumihimo.
First step : make the mobidai.
(do not hesitate to ask me the original file, the picture is not real size).
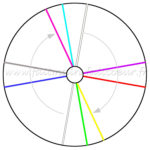
Print the disc (5” diameter – 13 cm) and glue it on a plain cardboard (0.08” thickness – 2 mm).
Hollow out the center and cut on the 32 black lines. To enlarge, I slipped a ruler into cuts.

Everything is in the inversion of 2 pairs of threads.
The upper right thread is moved below on the right (yellow on the right of green).
The lower left thread is moved up on the left (pink on the left of clear blue).
Turn your mobidai a quarter of tour towards the right (or towards the left if you are left handed. It’s as you want but always turn in the same direction).

Again the same moove :
The upper right thread is moved below on the right (grey on the right of purple).
The lower left thread is moved up on the left (red on the left of dark blue).
Turn your mobidai a quarter of tour and make the moove.
With the hand which holds the mobidai, guide your kumihimo by bottom (keep it centered and pull slightly).
To make a bracelet I cut threads 22” (55 cm) long.


Merci pour les explications des kumihimos, je me suis éclatée et j’en fais profiter mes élèves et ma famille qui en portent tous un maintenant au poignet !